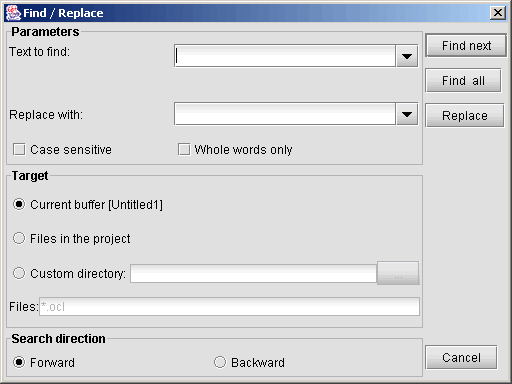
Fig.1 Find / Replace DialogOCLE provides a powerful, customizable text editor which is capable of undo / redo, advanced find / replace, syntax highlighting and auto-indentation for OCL.
The editor allows you to view and modify the contents of any text file. It also provides syntax highlighting for OCL text files, XML documents and java sources. The syntax highlighting mechanism is sensitive to the type of the active file. Auto-indentation is only available for OCL sources (the editor will apply it for any text file, but this will be fixed in a future version). The table below lists the key bindings used by the editor. This version does not allow you to change these bindings.
Key binding |
Action |
|
Ctrl + n |
Create new text file |
|
Ctrl + o |
Open existing file |
|
Ctrl + s |
Save the currently open file |
|
Ctrl + F4 |
Close the currently open file |
|
Ctrl + z |
Undo last editing operation |
|
Ctrl + y |
Redo the previously undone operation |
|
Ctrl + c |
Copy current selection to clipboard |
|
Ctrl + x |
Cut selection to clipboard |
|
Ctrl + v |
Paste text from clipboard |
|
Ctrl + f |
Invoke the Find / Replace dialog |
|
Ctrl + a |
Select the entire contents of the current file |
The editor allows you to create new files and edit existing ones. All these operations can be accessed via the Files menu of the application.
The Open (Ctrl+O) option allows you to open any text file, but the default file filters will display only OCL and BCR (business constraint rules) files. To open any other text file select All files from the File type list box of the file chooser dialog.
The editor displays all currently open files, each one in a separate window. Note that open diagrams are also displayed. Of course, the toolbar is automatically updated according to the active window. For any open file you see its full name as the title of the corresponding window. The editor also displays a combo box with all open windows, so that you can easily switch between them.
Before closing a dirty file, you will be prompted to save it. Dirty files are marked with an asterisk (*) in the corresponding window and also in the combo box. When exiting the application, all open files are closed, so you will be prompted to save the dirty ones.
The editor allows you to undo and then redo any editing operations such as character typing, cut and paste, replace and replace-all, text deletions. When you insert characters, they are grouped until a separator such as a blank or a parenthesis is encountered. So when you undo the typing, all characters defining an identifier are deleted. Separators are also grouped together, but only with other separators. For example, if you typed 'package Foundation::Core', the first undo operation will delete 'Core', the next one will delete the two ':' signs and so on.
If you do a Replace all operation (see next section) you can undo all replacements with a single undo operation. When possible, the editor will restore the selection, if the case.
The Undo and Redo operations are available through the Edit menu. See the corresponding shortcuts at the end of this section.
The text editor provides advanced search and replace capabilities, accessible through the Find / Replace option in the Edit menu. The dialog below appears when you select this option. It allows you to specify the direction for the search (forward / backward) relative to the caret position in the current file, also if you want to perform a case-sensitive search (the Case sensitive check box) and whether you are interested in whole words only (the Whole words only check box). Note that you can also perform a global search either in the project files or in the files you specify. To select the target files, click one of the radio buttons available in the Target section.
 |
Fig.1 Find / Replace Dialog |
Use the Find next button to search for the first occurrence of the text you entered in the Text to find: list box. This will take into account the search direction you specified and the Case sensitive and Whole words only options. If such an occurrence is found in the currently open file, it will be selected. If you specified other target than the current text file, the Find next button will be disabled. In this case you will not be able to specify the search direction because the search engine will take into account the entire contents of any of the files included in the search.
The Find all option is used to obtain all the occurrences of the text to find. They will be displayed in the Search results panel, grouped by the file in which they are located. Expanding a file node will lead to all the lines in that file that contain the text to find. Clicking on such a line in the Search results panel automatically selects the corresponding occurrence in the text editor. Note that the same line may be displayed more than once, if the given text to find appears more than once in that line.
If you specify Files in the project, all the files in the project will be included in the search, even if they are not selected in the project browser. To specify arbitrary file paths, use the Custom directory option. You will have to provide a directory as root and a file filter to match the file names. All the files in the specified directory and in all of its subfolders (recursive) will be compared against the specified pattern. The pattern may also contain the standard wildcards '*' and '?', where '*' means any string and '?' means any character. More than one pattern may be given. Multiple patterns are comma separated, as in the example '*.ocl, *.xml, *.java'. This implies that you cannot use commas in the specification of patterns.
If you select Replace you will be prompted to replace each occurrence of the text you search for with the new text. You may choose 'Yes', 'No', 'Stop' or 'All'. Selecting 'Yes' will simply replace the currently highlighted occurrence and pass to the next occurrence, if any. If you select 'No', the current occurence of the text to find is not replaced, but the search continues. Select 'Stop' to stop the search / replace process. If you want to replace all the remaining occurrences at once, just select 'All' when prompted. The Replace ... option is only available if the target for the search is set to Current buffer. Once you have specified that you want to replace all the occurrences of the search text, you can immediately undo the Replace all operation. In this case, all the replacements will be undone as one.
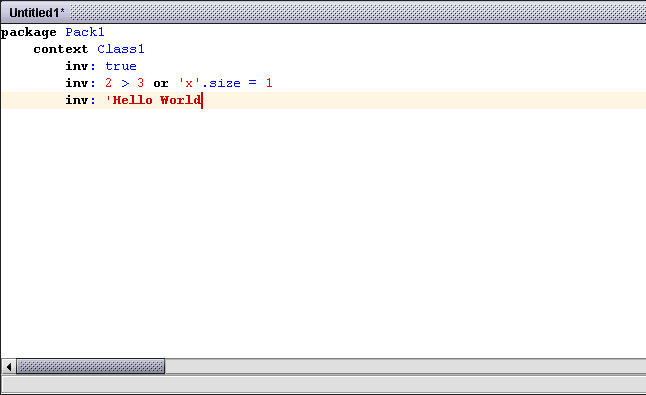
The editor provides syntax highlighting for OCL, XML and Java, but new languages (such as C++) may easily be added. As you can see in the figure below, reserved words, identifiers, numeric, string and enumeration literals and invalid entities are marked with different colors. The colors, as well as the typeface for each lexical category are easily selectable, see below.
 |
Fig.2 Syntax Highlighting |
 |
Back to main index |